Welcome
Thank you for purchasing Customer Order Product Upload extension!
This document contains information for Customer Order Product Upload extension. If you have any questions that are not found in this readme document, please look for contact information in the support section.
Extension info
Customer Order Product Upload
| Download Page: | www.opencart.com/index.php?route=extension/extension/info&extension_id=1887 |
| Version: | 1.6.9 (OCMOD release) |
| Release Date: | 26th November 2016 |
| OpenCart version compatibility: |
1.5.2, 1.5.2.1 1.5.3, 1.5.3.1 1.5.4, 1.5.4.1 1.5.5, 1.5.5.1 1.5.6, 1.5.6.1, 1.5.6.2, 1.5.6.3, 1.5.6.4 2.0.0.0, 2.0.1.0, 2.0.1.1, 2.0.2.0, 2.0.3.1 2.1.0.1, 2.1.0.2 2.2.0.0 2.3.0.0, 2.3.0.1, 2.3.0.2 |
| Demo: | OpenCart v2.3.0.x: demo.opencart.my/copu Admin Login: demo.opencart.my/copu/admin Username: demo Password: demo OpenCart v1.5.6.x: demo.opencart.my/copu2 Admin Login: demo.opencart.my/copu2/admin Username: demo Password: demo |
| Author: | Hydrowire - More extensions |
| Contact: | [email protected] |
Features
Overview
Extends the basic upload functionality in OpenCart to customer account, in an order, and on product page with many useful features including image preview, progress bar, and file size display.
What's New in v1.6.3 / v1.6.2
- Fixed customer account upload error
- Fixed large image file upload preview
- Fixed same filename issue in image cache
- Fixed custom template not found issue
- Fixed image preview crop off issue
- Fixed image replace issue
- Improved failed file deletion alert message
Highlights
- Enable customers to upload files to:
- own customer account
- an order
- products
- Thumbnail preview and pop-up available for image file type uploads.
- Product image can be replaced with uploaded image file.
- Progress bar available to indicate uploading progress.
- Supports multiple files with drag & drop ability.
- Display HTML text upload instruction for customers.
- All files uploaded by customer can be previewed and downloaded from the admin page easily.
- Added Email Alert for customer order history and account upload.
- Added Send Files as Email Attachments feature.
- Enable to set the following rules:
- Maximum and minimum number of files
- File size limit
- File types and MIME(optional)
- Customer group
- Store
- Added security features:
- MIME check to reduce risk of hidden script in files
- Uploaded files are stored in masked filename to prevent unauthorized access
Installation
Prerequisite
- OpenCart version must be a compatible version. Please refer to the 'OpenCart version compatibility' list stated above in the Extension Info.
- Skip to Install only if vQmod is installed and working on your store.
- Requires vQmod 2.4.1 minimum.(v2.5.1 for OpenCart v2.0.x) Get it from here: https://github.com/vqmod/vqmod/releases
- Follow instruction in https://github.com/vqmod/vqmod/wiki/Installing-vQmod-on-OpenCart
Important Bug Fix for OpenCart v2.0.2.0
There's a bug in OpenCart v2.0.2.0 that will affect Customer Order Product Upload extension. Please do the following to fix the bug.
- Visit the official OpenCart source code repository https://github.com/opencart/opencart/blob/master/upload/catalog/model/account/customer.php and download this file(Click on RAW button).
- Upload the file customer.php to your OpenCart store host /catalog/model/account/customer.php and replace it.
Install
- Upload all contents from upload folder into your OpenCart store root folder with an FTP software.
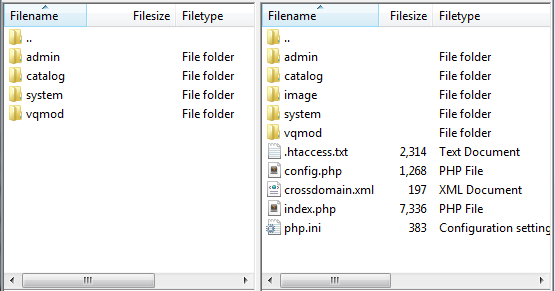
- For OpenCart v1.5.x, the following file will be replaced if present in your store:
- /catalog/view/theme/default/image/remove.png
- For OpenCart v2.0.x, no files will be replaced.
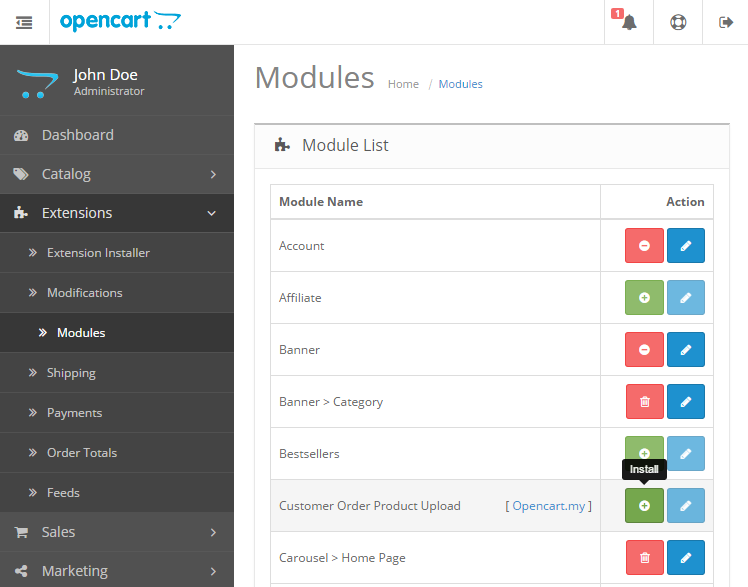
- Login to your admin page, go to Extensions > Modules, and click on the Install button for Customer Order Product Upload module.
Setup
- Click on the Edit button for Customer Order Product Upload to set upload settings.
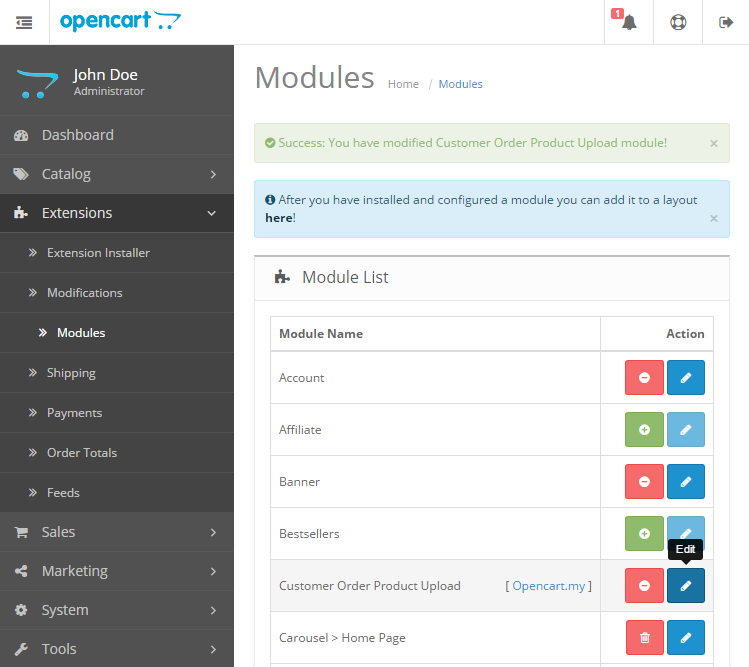
- Please see Usage section for further instructions.
Upgrade
Please follow the steps below if you are upgrading from a previous Customer Order Product Upload version.
Upgrading from Customer Order Product Upload v1.6.x to v1.6.5
- Copy all contents from upload folder into your store. Only files from previous version of Customer Order Product Upload will be replaced.
Upgrading from Customer Order Product Upload v1.5.x to v1.6-beta
Fresh install of extension is required for OpenCart v2.0.x.
Upgrading from Customer Order Product Upload v1.5.x to v1.5.5
- Copy all contents from upload folder into your store. Only files from previous version of Customer Order Product Upload will be replaced.
- That's all. There's no need to uninstall or re-install the extension from the admin module page.
Upgrading from Customer Order Product Upload v1.4.x
Attention: All existing file upload settings data from previous version will be lost. But uploaded files and data will be retained and accessible as before from the admin. However, as a precautionary step, please backup your store database and files before continuing this upgrade process.
- Copy all contents from upload folder into your store. Only files from previous version of Customer Order Product Upload will be replaced.
- Login to your admin page, navigate to Extensions > Modules > Customer Order Product Upload > [ Edit ].
- Setup your upload settings again. You can refer to the Usage section if required.
Upgrading from Customer Order Product Upload v1.3 and lower
- Copy all contents from upload folder into your store. Only files from previous version of Customer Order Product Upload will be replaced.
- Remove the following folders from your store:
- /admin/controller/upload/
- /admin/language/english/upload/
- /admin/model/upload/
- /admin/view/template/upload/
- Remove the following files from your store:
- /admin/view/image/upload.png
- /catalog/controller/account/upload.php
- /catalog/language/english/account/upload.php
- /catalog/model/account/upload.php
- /catalog/model/checkout/upload.php
- /catalog/view/theme/default/template/account/upload.tpl
- /system/helper/upload.php
- /vqmod/xml/copu.xml
- Login to your admin page, go to Extensions > Modules, and click on the Install for Customer Order Product Upload module. At this point, the upgrade will be done automatically in the background.
- Click on the Edit for Customer Order Product Upload module to setup your upload settings again. You can refer to the Usage section if required.
Usage
Customer Upload
Customer Upload enables customers to upload files to their account.
Click on Customer tab button to reveal Customer Upload settings.

Status

Enable or disable customer upload.
Enable Upload in Registration

Enable file upload on new customer registration page.
Enable Email Alert

Enable Admin email alert whenever a file is uploaded by a customer from their account upload page.
Enable Drag & Drop

Enable files to be dragged from desktop & dropped into the upload area drop zone.
Enable Multiple/Batch Files Upload

Enable multiple files selection upon browsing.
Maximum Number of File Upload

Maximum number of files allowed to upload.
Minimum Required Upload

Minimum number of files required to upload. Customer will not be able to proceed with registration if minimum number of uploaded files is not met.
Number of Files per Page

Number of files per page in customer's account upload page.
Maximum File Size

Set a maximum file size limit for file upload.
Please note that larger file size limit may not work as file size limit is ultimately depending on server configuration. Please see Troubleshoot / FAQ section for more details.
Maximum Image Dimension (W x H)

Set a maximum image dimension limit for image file types. Insert 0 x 0 to disable image dimension limit.
Image Color Channel

Select between RGB & CMYK as a color channel restriction for image file types.
Select Any to disable color channel restriction.
Maximum Filename Cut-off Length

Set a maximum length for filenames to be displayed on store front in number of characters.
Actual physical filename on server will not be shorten.
File Upload Folder

Set a custom folder path to store customer's file uploads. Relative to store root folder.
- If left blank, OpenCart's default DIR_DOWNLOAD path in /config.php ("/download/" folder will be used for OpenCart v1.5.x, while "/system/upload/" will be used for OpenCart v2.0.x).
- NO trailing slash(/) required.
- Use "%customer_id%" to organize customer's uploads into different folders according to their customer_id.
- Examples:
- photos
- upload/files
- images/%customer_id%
- uploads/%customer_id%/file
Send Files as Email Attachments

Include the customer uploaded files in the admin email alert as attachment files.
You will first need to enable "New Account Alert Email" in System > Settings > Your Store [Edit] > Mail tab(OCv1.5.x) or Option tab(OCv2.0.x).
(Please check with your hosting provider if sending out emails with attachment is not allowed.)
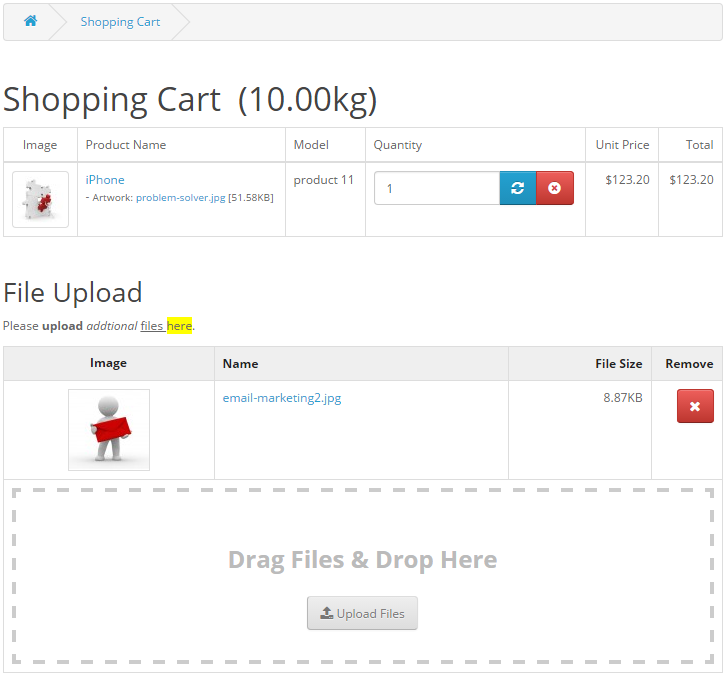
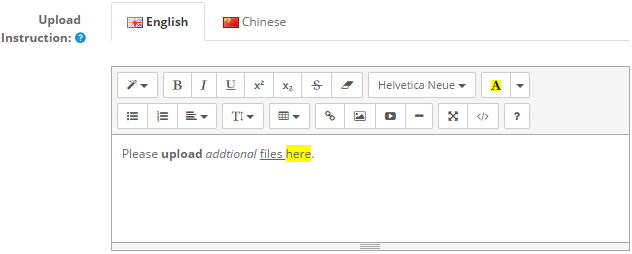
Upload Instruction

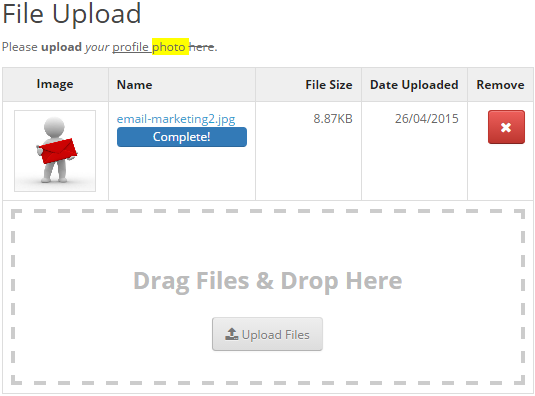
Insert HTML text to display above the upload area. Useful for providing uploading instruction or any other messages to store customers.
Example:
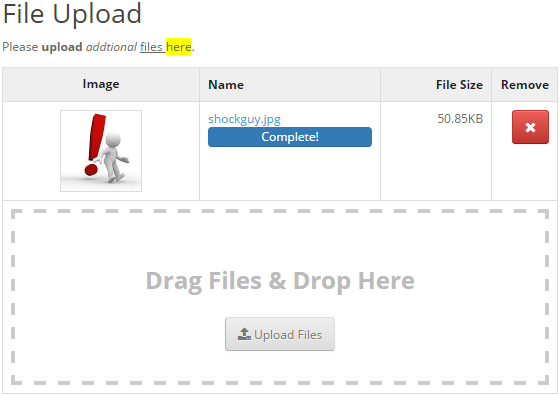
Preview Uploaded Image

Display a thumbnail preview of uploaded image file type. A larger pop-up image is also available when customer clicks on the thumbnail.
Example:
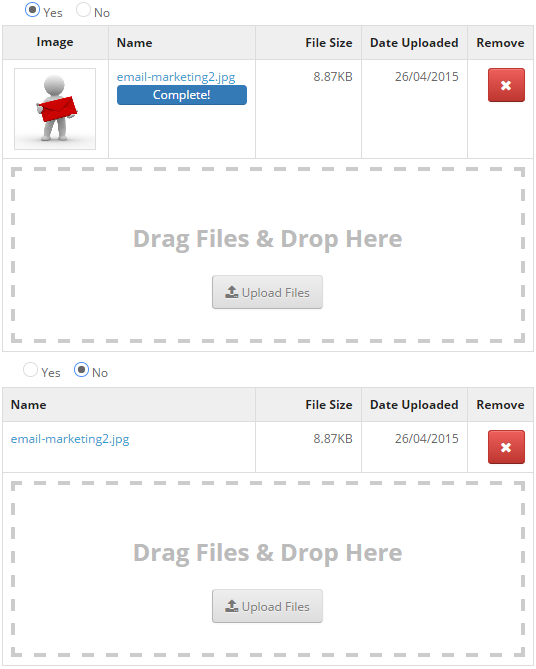
Image Preview Dimension (W x H)

Set the width and height value in pixels for image preview dimension size.
Allowed File Type
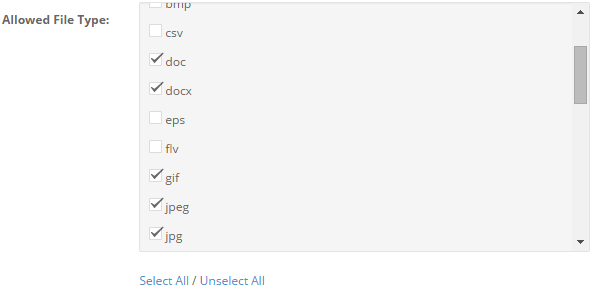
Select the allowed file types for files upload.
Login Required

If set to Yes, only logged in customer are allowed to upload files.
In this case for Customer Upload, 'No' option has been disabled because only logged in customer are allowed to upload files to their account.
Customer Group
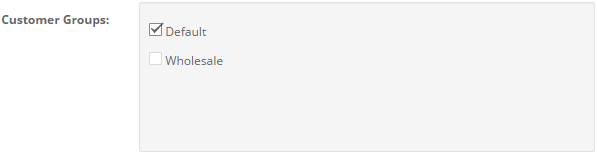
Select customer groups that are allowed to upload files if Login Required is set to Yes.
Store
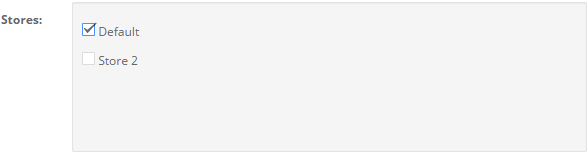
Enable file upload to selected stores only.
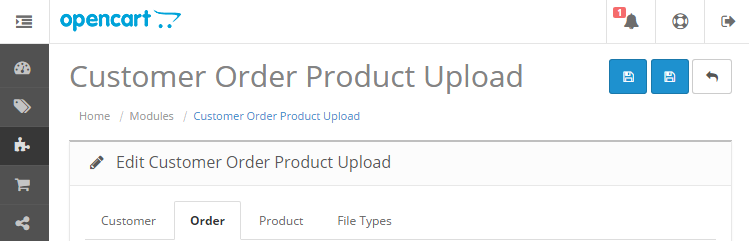
Order Upload
Order Upload enables customers to upload files to an order on cart page.
Click Order tab button to reveal Order Upload settings.
Status
Enable or disable order upload.
Enable Upload in Customer Orders History

If set to Yes, customer will be able to upload additional files to their orders that have been made in customer's account Order History. This is useful in cases where missing or wrong files uploaded by customer when making their orders.
For example:
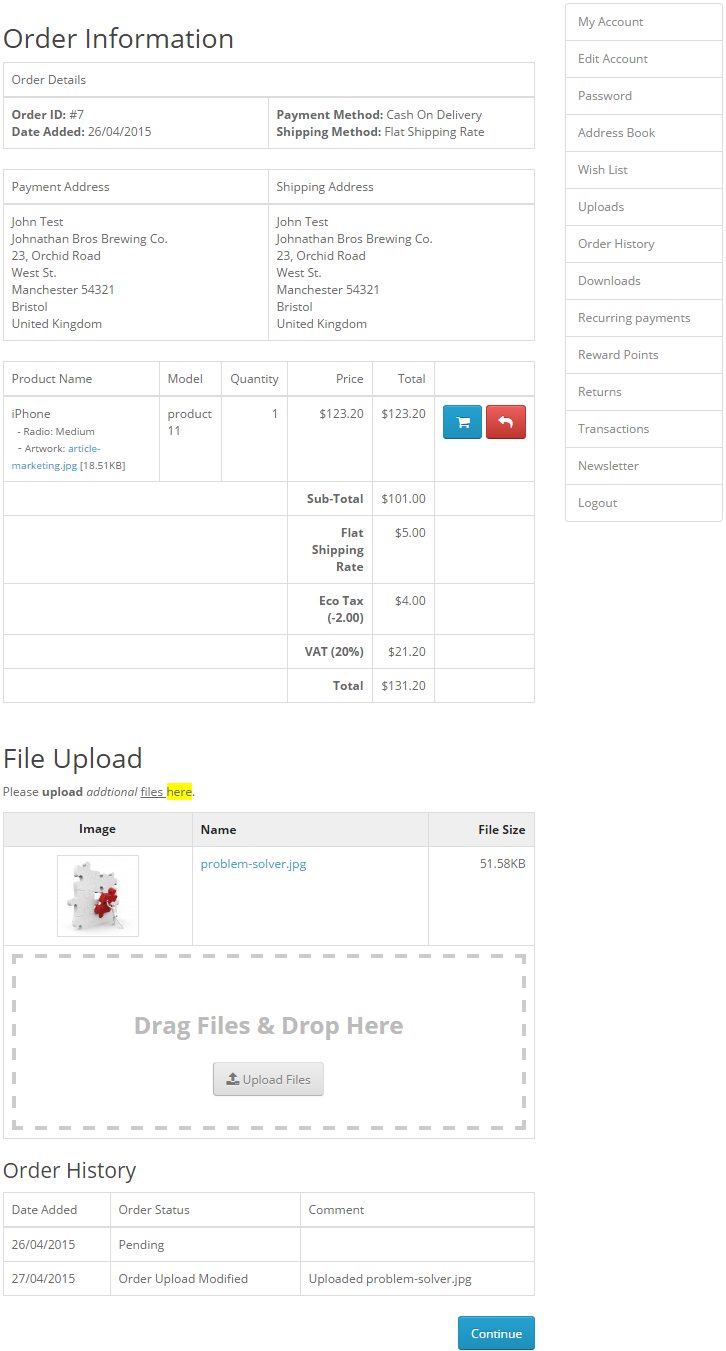
Customer Order History Update Status
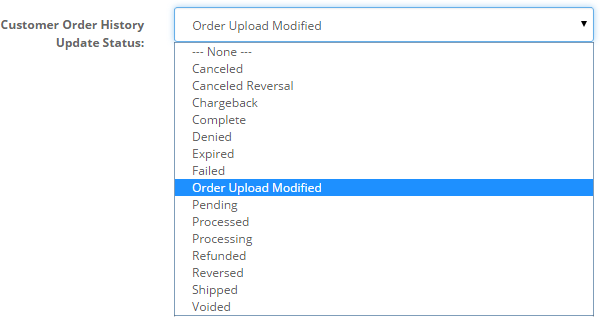
Select an Order Status to be used when customer uploads a file to an order in their account order history page. (Only when Enable Upload in Customer Orders History above is set to Yes.)
Recommended to create a new order status(under System > Localisation > Order Statuses) for this so that you as a store admin will know when a customer has uploaded a new file to a particular order by its updated order status.
Enable Order History Upload Email Alert

Enable Admin email alert whenever a file is uploaded by a customer to an existing order from their account order history info page.
Enable Drag & Drop
Enable files to be dragged from desktop & dropped into the upload area drop zone.
Enable Multiple/Batch Files Upload
Enable multiple files selection upon browsing.
Maximum Number of File Upload
Maximum number of files allowed to upload.
Minimum Required Upload
Minimum number of files required to upload. Customer will not be able to proceed to Checkout if minimum number of uploaded files in an order is not met.
Maximum File Size
Set a maximum file size limit for file upload.
Please note that larger file size limit may not work as file size limit is ultimately depending on server configuration. Please see Troubleshoot / FAQ section for more details.
Maximum Image Dimension (W x H)
Set a maximum image dimension limit for image file types. Insert 0 x 0 to disable image dimension limit.
Image Color Channel
Select between RGB & CMYK as a color channel restriction for image file types.
Select Any to disable color channel restriction.
Maximum Filename Cut-off Length
Set a maximum length for filenames to be displayed on store front in number of characters.
Actual filename will not be shorten.
File Upload Folder

Set a custom folder path to store customer's order file uploads. Relative to store root folder.
- If left blank, OpenCart's default DIR_DOWNLOAD path in /config.php ("/download/" folder will be used for OpenCart v1.5.x, while "/system/upload/" will be used for OpenCart v2.0.x).
- NO trailing slash(/) required.
- Use "%customer_id%" to organize customer's order uploads into different folders according to their customer_id.
- Use "%order_id%" to organize customer's order uploads into different folders according to the Order #ID.
- Examples:
- photos
- upload/files
- images/%order_id%
- uploads/%customer_id%/%order_id%
- extras/%customer_id%/%order_id%/files
Send Files as Email Attachments
Include the order upload files in the admin email alert as attachment files.
You will first need to enable "New Order Alert Email" in System > Settings > Your Store [Edit] > Mail tab(OCv1.5.x) or Option tab(OCv2.0.x).
(Please check with your hosting provider if sending out emails with attachment is not allowed.)
Upload Instruction
Insert HTML text to display before the upload section. Useful for providing uploading instruction or any other messages for store customers.
Example:
Preview Uploaded Image
Display a thumbnail preview of uploaded image file type. A larger pop-up image is also available when customer clicks on the thumbnail.
Example:
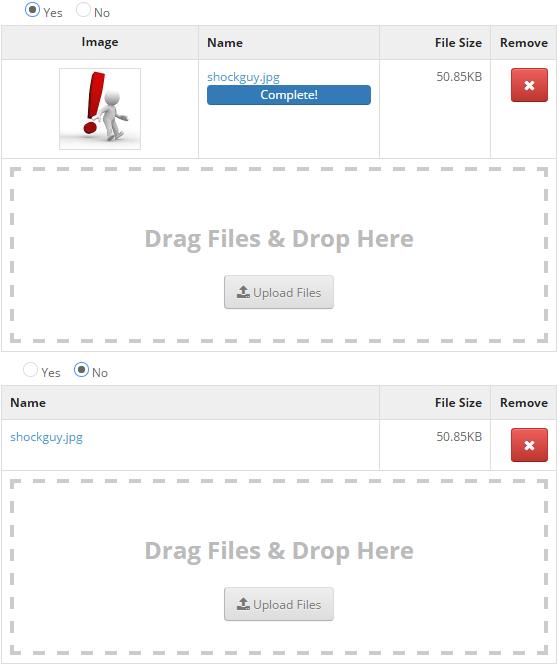
Image Preview Dimension (W x H)
Set the width and height value in pixels for image preview dimension size.
Allowed File Type
Select the allowed file types for files upload.
Login Required

If set to Yes, only logged in customer are allowed to upload files.
Customer Group
Select customer groups that are allowed to upload files if Login Required is set to Yes.
Store
Enable file upload to selected stores only.
Product Upload
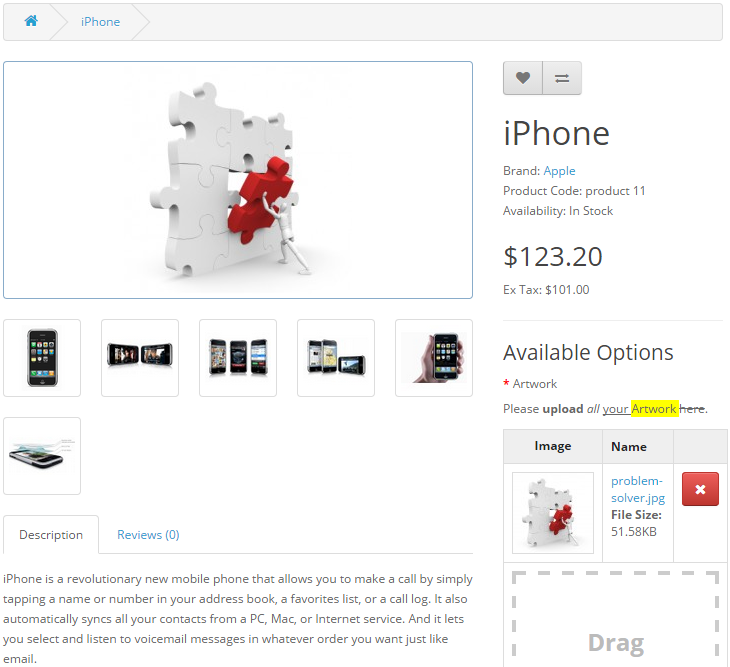
Product Upload extends the basic 'File' type option upload functionality on product page with extra controls and useful features.
Click on Product tab button to reveal Product Upload settings.

Add Product Upload
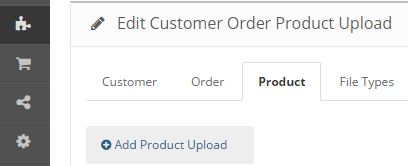
Click on the (+) Add Product Upload button to add new Product Upload settings entry. You can add different product upload for different 'File' type upload option that can be added to the same or different product.
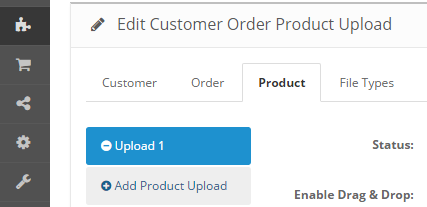
Click on the (-) Upload nth button to remove unwanted Product Upload settings entry.
Status
Enable or disable product upload.
Enable Drag & Drop
Enable files to be dragged from desktop & dropped into the upload area drop zone.
Enable Multiple/Batch Files Upload
Enable multiple files selection upon browsing.
Maximum Number of File Upload
Maximum number of files allowed to upload.
Minimum Required Upload
Minimum number of files required to upload. Customer will not be able to add the product to cart if minimum number of uploaded files for that option is not met.
Force Quantity

If set to Yes, the order quantity of a product will be forced to equals with the total number of files uploaded by a customer.
Maximum File Size
Set a maximum file size limit for file upload.
Please note that larger file size limit may not work as file size limit is ultimately depending on server configuration. Please see Troubleshoot / FAQ section for more details.
Maximum Image Dimension (W x H)
Set a maximum image dimension limit for image file types. Insert 0 x 0 to disable image dimension limit.
Image Color Channel
Select between RGB & CMYK as a color channel restriction for image file types.
Select Any to disable color channel restriction.
Maximum Filename Cut-off Length
Set a maximum length for filenames to be displayed on store front in number of characters.
Actual filename will not be shorten.
File Upload Folder

Set a custom folder path to save customer's product file uploads. Relative to store root folder.
- If left blank, OpenCart's default DIR_DOWNLOAD path in /config.php ("/download/" folder will be used for OpenCart v1.5.x, while "/system/upload/" will be used for OpenCart v2.0.x).
- NO trailing slash(/) required.
- Use "%customer_id%" to organize customer's product uploads into different folders according to their customer_id.
- Use "%order_id%" to organize customer's product uploads into different folders according to the Order #ID.
- Use "%product_id%" to organize customer's product uploads into different folders according to each Product #ID.
- Examples:
- photos
- upload/files
- artwork/%product_id%
- images/%product_id%/%order_id%
- uploads/%customer_id%/%order_id%/%product_id%
- extras/%product_id%/files/%customer_id%
Send Files as Email Attachments
Include the product upload files in the admin email alert as attachment files.
You will first need to enable "New Order Alert Email" in System > Settings > Your Store [Edit] > Mail tab(OCv1.5.x) or Option tab(OCv2.0.x).
(Please check with your hosting provider if sending out emails with attachment is not allowed.)
Upload Instruction
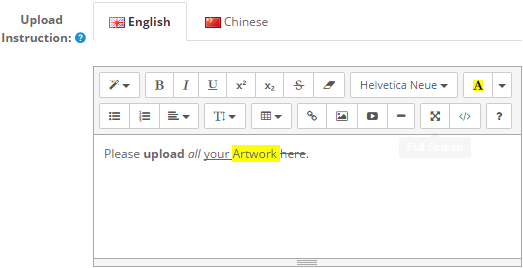
Insert HTML text to display before the upload section. Useful for providing uploading instruction or any other messages for store customers.
Example:
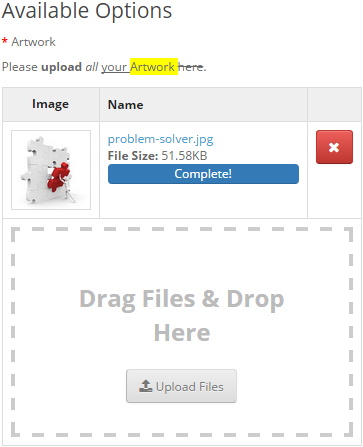
Preview Uploaded Image
Display a thumbnail preview of uploaded image file type. A larger pop-up image is also available when customer clicks on the thumbnail.
Example:
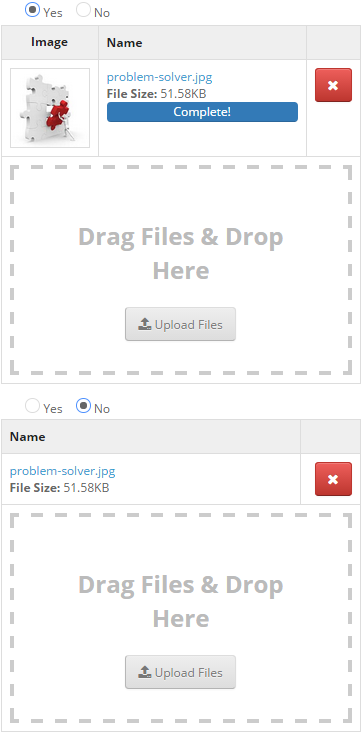
Image Preview Dimension (W x H)
Set the width and height value in pixels for image preview dimension size.
Replace Product Image

Replaces product image with uploaded image file. This only works for image file types.
Example:
Allowed File Type
Select the allowed file types for files upload.
Product Options
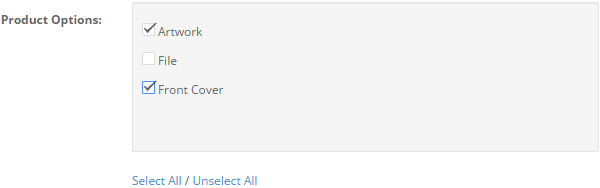
All 'File' type options will be listed here. If any of the 'File' type options are selected, the normal file upload button of any product that contains the selected options will be replaced with this custom file upload module.
Please follow the steps below to add a file type upload module on product page:
- Navigate to Catalog > Options and click the on the Add New button to create a new Option.
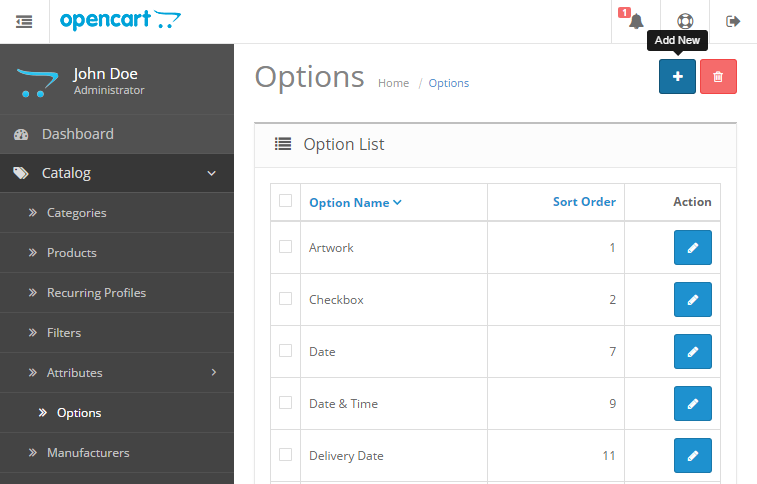
- Insert an Option Name and make sure to select Type as 'File'.
You can use the Sort Order value to position the upload module between other product options on a product page.
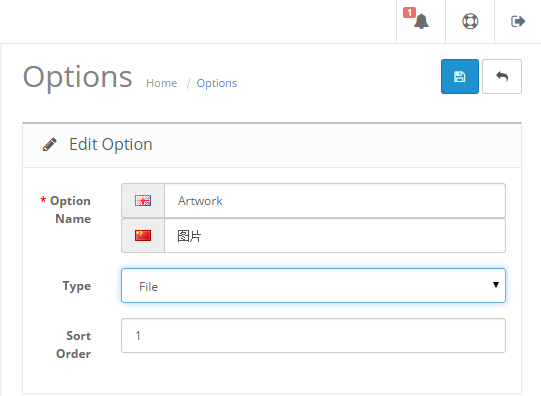
- Click the Save button to save it.
- Navigate to Catalog > Products and Edit or Add New product.

- Under 'Option' tab, add the File type option created in step 3 by typing the Option Name in the text field and selecting it from the drop down that appears.
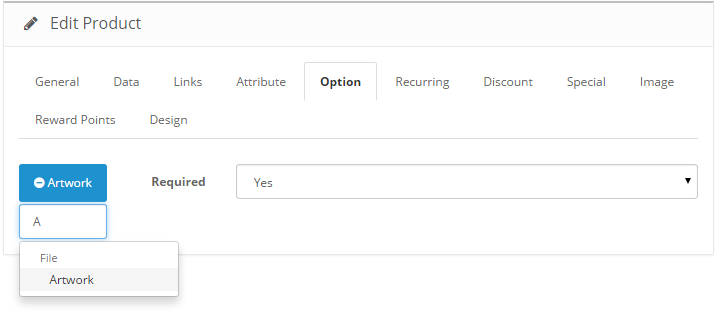
- Click the Save button to save the product.
- Navigate back to Extensions > Modules, and click on the Edit button for 'Customer Order Product Upload' to configure the settings.
- Under Product tab, scroll down to Product Options and select the File type Option Name created in step 3.
- Click the Save button to save the settings.
Login Required
If set to Yes, only logged in customer are allowed to upload files.
Customer Group
Select customer groups that are allowed to upload files if Login Required is set to Yes.
Store
Enable file upload to selected stores only.
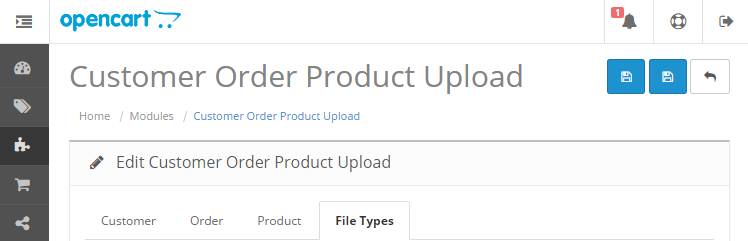
Managing File Types
Click File Types tab button to reveal File Types list.
Adding a File Type
- Scroll down to the bottom of the list and you will see a form to enter new file type.
- Key in the file extension on the left and MIME(optional) on the right and click on the Add button to add a new file type entry.
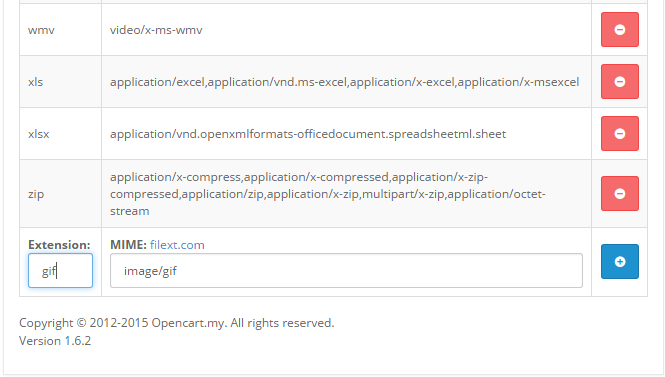
Utilizing MIME
- Adding MIME to a file type provides an added level of security in file uploads. With MIME, the server is able to recognize a file content type beyond the existing file extension. This feature will reduce the risk of files with incorrect file extension being uploaded, usually with malicious purposes.
- To find out a file type MIME, visit filext.com and search for the file type.
- However, for some reason, not all hosting servers will return the appropriate file type. If your hosting server is facing difficulties in uploading certain file types even though the correct MIME has been entered, and you are not allowed to make any changes to your server due to shared hosting or hosting provider policy, then you have to disable MIME checking.
- To disable MIME, just leave the MIME entry blank when adding a new file type.
- To erase existing file type MIME, you will need to delete the existing file type entry and re-create a new one with the same extension but without any MIME.
Deleting a File Type
- Click on the Delete button on the file type that you wish to remove.
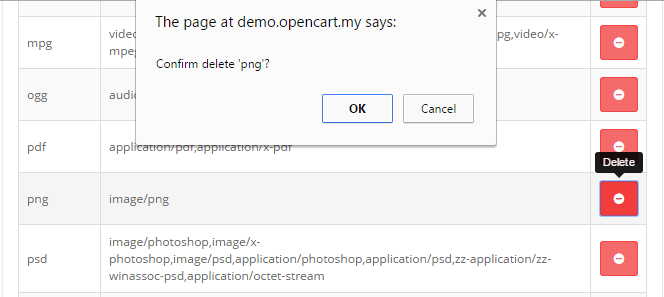
- A message window will appear, prompting for delete confirmation.
Save
Click the Save button after you are done with the settings.
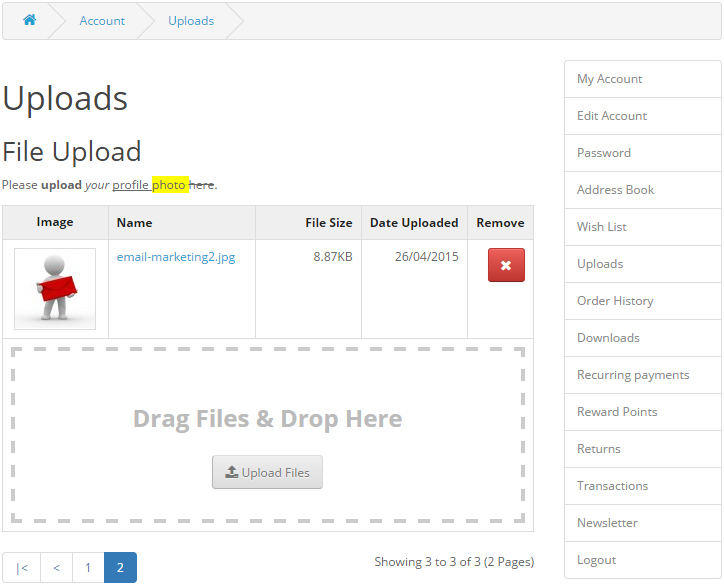
Retrieving Uploaded Files
Accessing Customer Upload
- To access customer uploaded files from the admin, navigate to Sales > Customers > Customers, and Edit a customer.
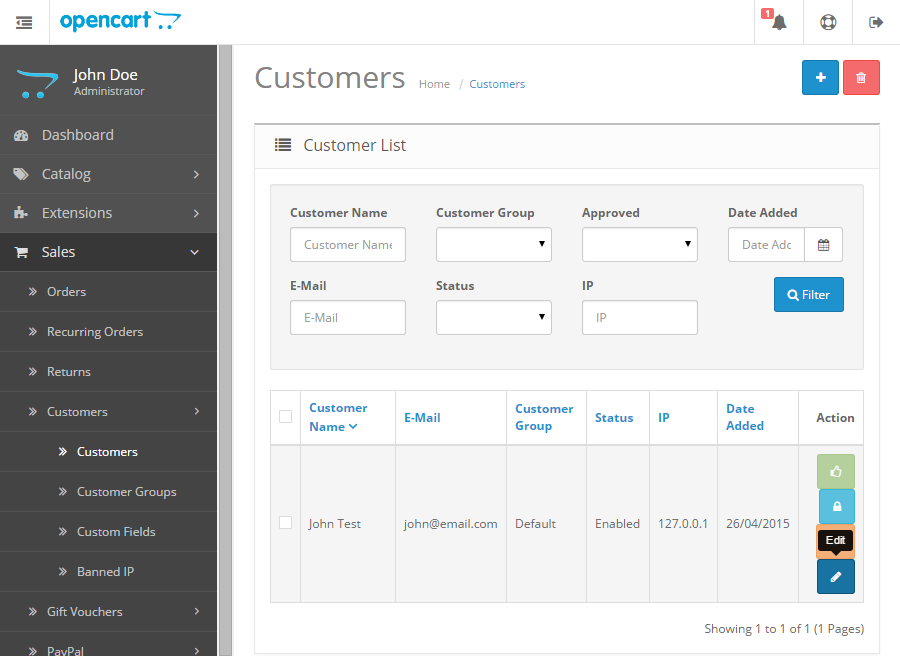
- While editing a customer, click on the Uploads tab to reveal the list of files uploaded by the customer to their account.
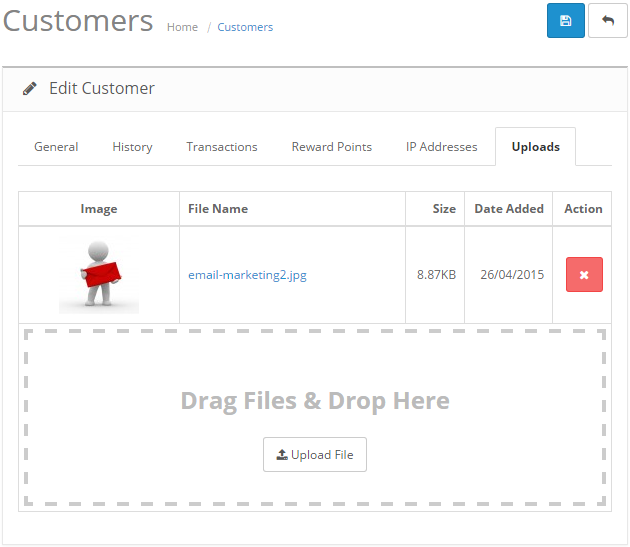
- On this page, you can perform the following actions:
- Download: Click on the filenames to download a copy of the file
- Delete: Click on the Delete button to delete a file
- Upload: Click on the Upload File button to upload a new file. This customer will then be able to download the file from their account.
- Click the Save button to save the changes or Cancel to discard any changes.
Accessing Order Upload
- To access uploaded files in an order from the admin, navigate to Sales > Orders.
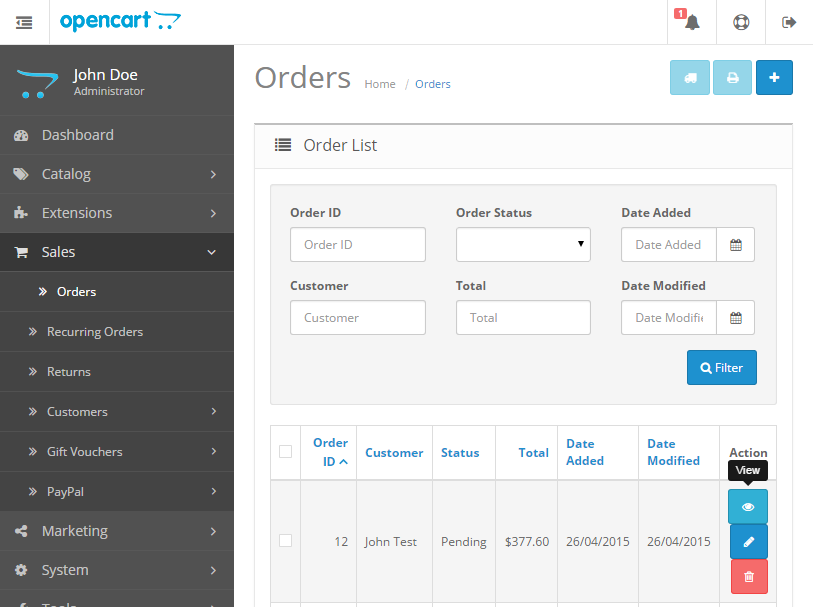
- If you just want to download files uploaded by customer, click on the View button to view an order.
- While viewing an order, click on the Uploads tab to reveal the list of files uploaded by the customer.
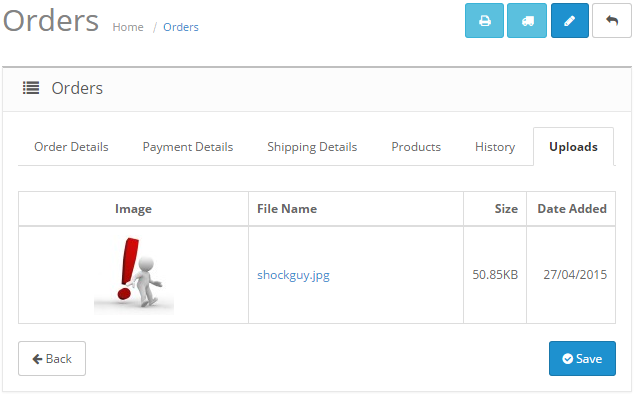
- To download a file, click on the filenames to download a copy of the file.
- If you want to delete or add a new file, go back to the Order List and and click on the Edit button to edit an order instead. (However, editing an order is only available for OpenCart v1.5.2 and newer.)
- While editing an order, click on the Uploads tab to reveal the list of files uploaded by the customer.
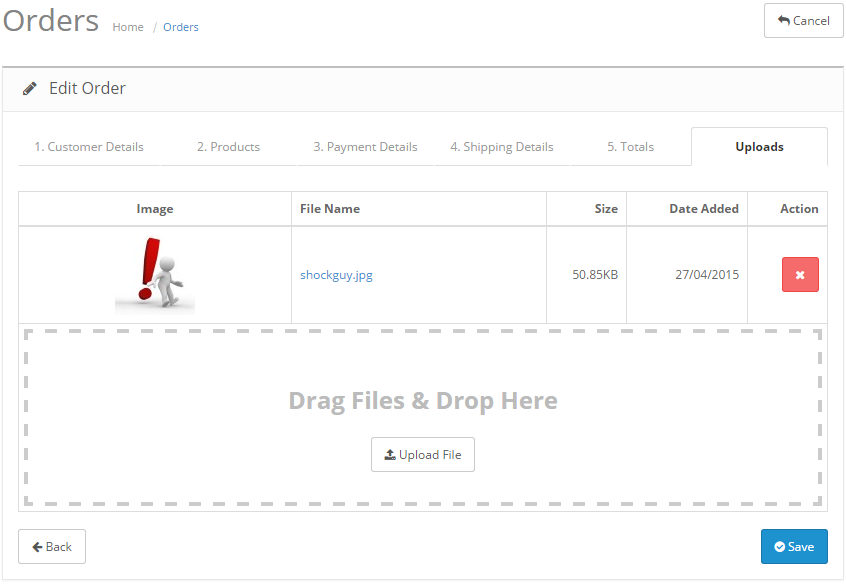
- After going through Step 1 to 5, the Uploads page will be on the last tab. On this page, you can perform the following actions:
- Download: Click on the filenames to download a copy of the file.
- Delete: Click on the Delete button to delete a file.
- Upload: Click on the Upload File button to upload a new file. Customer will then be able to download the file from their account order history.
- Click the Save button to save the changes or Cancel to discard any changes.
Accessing Product Upload
- To access uploaded files on products in an order from the admin, navigate to Sales > Orders.
- If you just want to download files uploaded by customer, click on the View button to view an order.
- While viewing an order, click on the Products tab to reveal the list of files uploaded by the customer within each product.
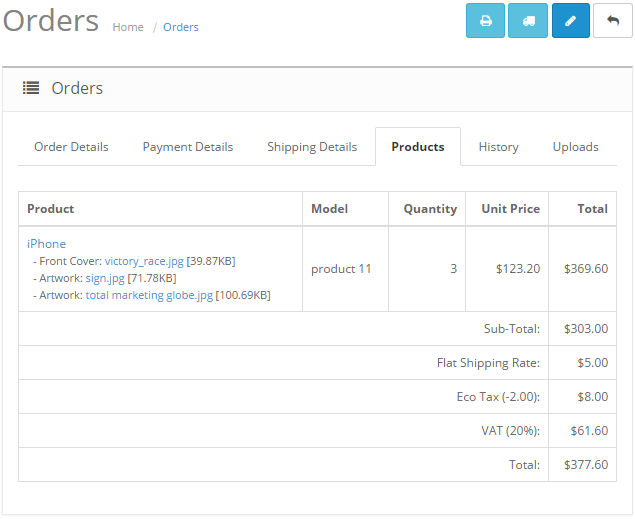
- To download a file, click on the filenames to download a copy of the file.
- If you want to delete or add a new file, go back to the Order List and and click on the Edit button to edit an order instead. (However, editing an order is only available for OpenCart v1.5.2 and newer.)
- While editing an order, click on the Products tab to reveal the list of files uploaded by the customer within each product.
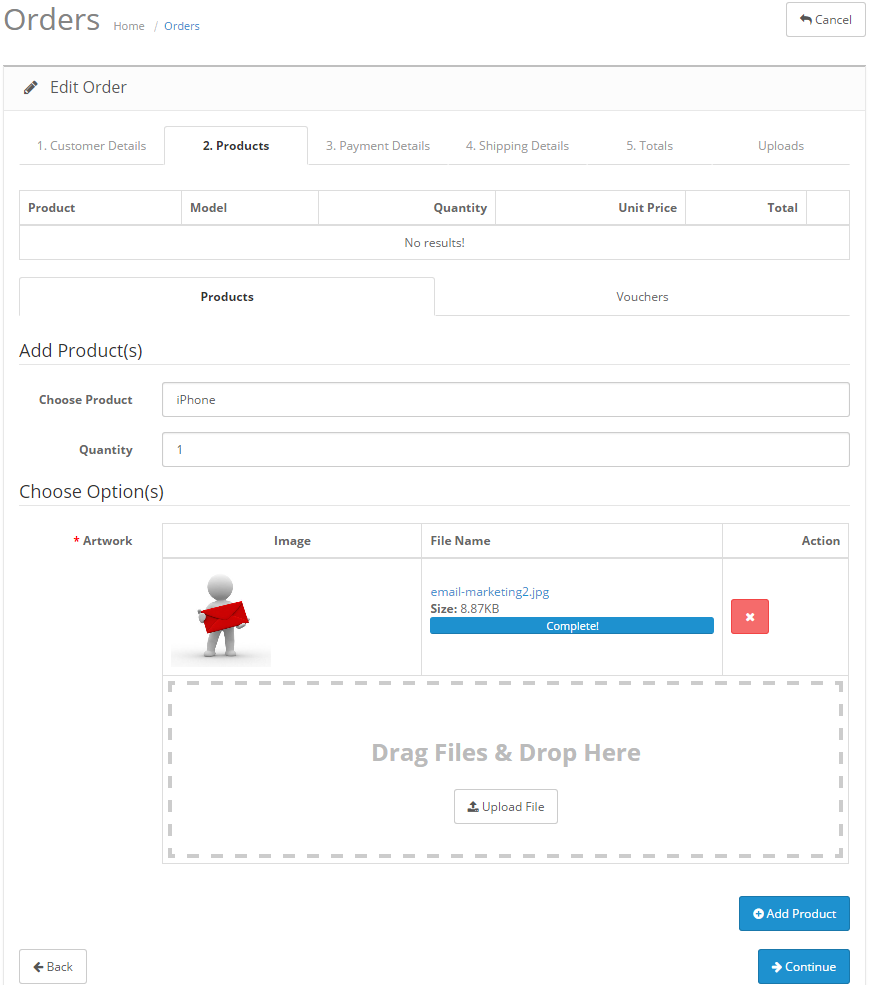
- On this page, you can perform the following actions:
- Delete: Click on the delete icon to delete a product and its associate files.
- Upload: Add a new product by typing the product name in the Choose Product field. If the product contains a file type options and it's selected in the Product Upload Product Options list, click on the Upload File button to upload new files, and click on the Add Product button to add a new product to the order.
- Click the Continue button to complete the form and save the changes or Cancel to discard any changes.
Customization
Custom Language
The Upload Instruction HTML text editor readily supports multi languages. Any custom language present on your store will be listed as tabs above each Upload Instruction HTML text editor.
Just click on the tabs to insert different custom language text into the editor, and the relevant text will be displayed on the front end depending on the language chosen by a customer.
To customize other module text such as table column names and button text, please perform the following steps (assuming 'spanish' is custom language folder name):
- Open and edit your admin custom language main file:
- /admin/language/spanish/spanish.php
- Add the following code at the bottom of the page right before the php closing tag '?>':
$_['tab_copu'] = 'Uploads'; //or any text that matches your custom language
- Make a copy of the following file:
- /admin/language/english/module/myoccopu.php
- Paste it into your custom language folder:
- /admin/language/spanish/module/myoccopu.php
- Open and edit the newly copied file /admin/language/spanish/module/myoccopu.php
- Edit the text in the file to your custom language accordingly.
- Make a copy of the following file:
- /catalog/language/english/myoc/copu.php
- Paste it into your custom language folder:
- /catalog/language/spanish/myoc/copu.php
- Open and edit the newly copied file /catalog/language/spanish/myoc/copu.php
- Edit the text in the file to your custom language accordingly.
Custom Template
The following steps provide a basic guide in customizing Customer Order Product Upload for your custom template on your store.
Please note that:
- It is to be performed after installation.
- All files listed below are from your store server.
- Assuming custom template folder is 'custom_theme'.
- Might not work on some custom template.
- Make a copy of the following folder:
- /catalog/view/theme/default/template/myoc/
- Paste it into your custom template folder:
- /catalog/view/theme/custom_theme/template/myoc/
- Open and edit the following files to suit your custom template if required:
- /catalog/view/theme/custom_theme/template/myoc/copu.tpl
- File upload module on account, register, and cart page - /catalog/view/theme/custom_theme/template/myoc/copu_cart.tpl
- List of uploaded files on shopping cart items - /catalog/view/theme/custom_theme/template/myoc/copu_customer.tpl
- Customer account upload page - /catalog/view/theme/custom_theme/template/myoc/copu_mail.tpl
- Email template for order summary sent to customer and admin - /catalog/view/theme/custom_theme/template/myoc/copu_product.tpl
- File upload module on product page
- /catalog/view/theme/custom_theme/template/myoc/copu.tpl
- Make a copy of the following stylesheet:
- /catalog/view/theme/default/stylesheet/copu.css
- Paste it into your custom template folder:
- /catalog/view/theme/custom_theme/stylesheet/copu.css
- Open and edit the newly copied file /catalog/view/theme/custom_theme/stylesheet/copu.css with your custom css styles.
- If certain upload module element is not loading on certain pages on your custom template, you need to open and edit /vqmod/xml/myoc_copu.xml
- Search for the matching file name in the <file> tag with your custom template file.
- In this example, we will try to edit /catalog/view/theme/*/template/product/product.tpl file in this vQmod <file> tag entry:
<file name="catalog/view/theme/*/template/product/product.tpl"> <operation> <search position="before"><![CDATA[<?php echo $button_upload; ?>]]></search> <add><![CDATA[<?php } if($option['type'] == 'file' && $copu_product && isset($copu_product[$option['product_option_id']])) { echo $copu_product[$option['product_option_id']]; } elseif($option['type'] == 'file') { ?>]]></add> </operation> ... </file> - Make sure in your custom template /catalog/view/theme/custom_theme/template/common/product.tpl file that the text in between the <search>><![CDATA[ ... ]]></search> tag exists.
<?php echo $button_upload; ?>
- If not, you need to modify the text in between the <search> tag into something else similar that exists in your custom template file.
- Repeat step 8 to 11 for other custom template files if required.
Troubleshoot / FAQ
Q: Installation failed.
A: Make sure your current store database user account have permission to 'CREATE', 'DELETE', 'DROP', 'SHOW', and 'RENAME' tables in your MySQL database.
Q: Extension is not working after installation.
A: Make sure vQmod is installed and running fine on your store. If you are using a custom template, you might require to customize the extension. Please see Customization > Custom Template.
Q: Upload module is not showing up.
A: Make sure you have set the extension settings properly in your admin. Please see Usage section on settings instruction.
Q: Upload Instruction HTML text editor is showing a blank/grey page instead of text.
A: Click the 'Source' button on the top left corner of the editor twice to reveal the text again.
Q: Image preview is not showing on IE.
A: Image preview is tested to work in Chrome, Firefox, Safari, and IE10. IE9 and below may not be supported due to browser limitation.
Q: Progress Bar is not showing or working properly on IE.
A: Progress bar is tested to work in Chrome, Firefox, Safari, and IE10. IE9 and below is not supported due to browser limitation.
Q: Drag & Drop files is not working on IE.
A: Drag & Drop is tested to work in Chrome, Firefox, Safari, and IE10. IE9 and below may not be supported due to browser limitation.
Q: Progress Bar is not showing or working properly on IE.
A: Progress bar is tested to work in Chrome, Firefox, Safari, and IE10. IE9 and below is not supported due to browser limitation.
Q: Progress Bar is not showing or working properly on any browser.
A: Make sure your store template is loading the Bootstrap Javascript file and its CSS file.
Q: Progress Bar stuck at 100% and not completing.
A: Make sure your store hosting server has enough memory and resources to process the uploaded file especially for large image files. Here's a list of all possible php.ini settings that might affect file upload:
- upload_max_filesize (in bytes, example value: 999M)
- post_max_size (must be larger than upload_max_filesize)
- memory_limit (must be larger than post_max_size)
- max_execution_time (in seconds)
- max_input_time (in seconds)
Q: Unable to upload certain file types even though the correct extension and MIME has been set.
A1: Please make sure you have also selected it in the 'Allowed File Types' list in the settings.
A2: Some hosting server might be returning incorrect MIME, so you may want to remove the MIME in the filetype list. Please see Usage > Managing File Types > Utilizing MIME for further details.
Q: Unable to upload large file even though File Size Limit has been set to very large value.
A: Some server may limit user from uploading large file size with server side settings. Here's a list of all possible php.ini settings that might affect file upload:
- upload_max_filesize (in bytes, example value: 999M)
- post_max_size (must be larger than upload_max_filesize)
- memory_limit (must be larger than post_max_size)
- max_execution_time (in seconds)
- max_input_time (in seconds)
You can try to change the above values in the provided php.ini & .htaccess file found in OpenCart root folder or check with your hosting provider for further information.
Q: Where are all the uploaded files stored by default?
A: OpenCart v1.5.x: DIR_DOWNLOAD path as in /config.php or /download/ folder.
A: OpenCart v2.0.x: DIR_DOWNLOAD path as in /config.php or /system/upload/ folder.
Q: How to change the default file upload folder? (For OpenCart v1.5.x & v1.4.x only)
A(FOR Customer Order Product Upload v1.5): Just use the File Upload Folder setting to customize file upload folder location.
A(FOR Customer Order Product Upload v1.4.x and below ONLY): Since the upload folder is sharing the same folder with OpenCart default download folder, you can change the folder location in the /config.php file. Please note that modifying the upload folder will also changes the default download folder.
- Open and edit the following file:
- /config.php
- Look for the following similar line of code:
define('DIR_DOWNLOAD', '/home/user/public_html/ocstore/download/'); - Modify the 'download' folder to your prefer location, for example 'myupload':
define('DIR_DOWNLOAD', '/home/user/public_html/ocstore/myupload/'); - Open and edit the following file:
- /admin/config.php
- Look for the following similar line of code:
define('DIR_DOWNLOAD', '/home/user/public_html/ocstore/download/'); - Modify the 'download' folder to the same location as in step 3 above:
define('DIR_DOWNLOAD', '/home/user/public_html/ocstore/myupload/');
Uninstall
Please follow the steps below to uninstall Customer Order Product Upload from your store.
- Login to your store admin and navigate to Extensions > Modules.
- Click on the Uninstall button for 'Customer Order Product Upload' module. WARNING: All file upload data will be erased.
- Remove the following files from your store.
- /admin/controller/module/myoccopu.php
- /admin/controller/myoc/copu.php
- /admin/language/english/module/myoccopu.php
- /admin/model/myoc/copu.php
- /admin/view/stylesheet/myoc/copu.css
- /admin/view/template/myoc/copu.tpl
- /admin/view/template/myoc/copu_invoice.tpl
- /admin/view/template/myoc/copu_product.tpl
- /admin/view/template/myoc/copu_upload.tpl
- /catalog/controller/myoc/copu.php
- /catalog/language/english/myoc/copu.php
- /catalog/model/myoc/copu.php
- /catalog/view/javascript/jquery/myoc/canvas-to-blob.min.js
- /catalog/view/javascript/jquery/myoc/copu-helper.js
- /catalog/view/javascript/jquery/myoc/jquery.fileupload.js
- /catalog/view/javascript/jquery/myoc/jquery.fileupload-image.js
- /catalog/view/javascript/jquery/myoc/jquery.fileupload-process.js
- /catalog/view/javascript/jquery/myoc/jquery.iframe-transport.js
- /catalog/view/javascript/jquery/myoc/jquery.ui.widget.js
- /catalog/view/javascript/jquery/myoc/load-image.all.min.js
- /catalog/view/javascript/jquery/myoc/load-image.min.js
- /catalog/view/theme/default/stylesheet/myoc/copu.css
- /catalog/view/theme/default/template/myoc/copu.tpl
- /catalog/view/theme/default/template/myoc/copu_cart.tpl
- /catalog/view/theme/default/template/myoc/copu_customer.tpl
- /catalog/view/theme/default/template/myoc/copu_mail.tpl
- /catalog/view/theme/default/template/myoc/copu_product.tpl
- /system/helper/copu.php
- /vqmod/xml/myoc_copu.xml
Changelog
Version 1.6.9 (OCMOD release)
Release Date: 26th November 2016
- Support for OCMOD installation option
Version 1.6.9
Release Date: 26th October 2016
- Support for latest OpenCart v2.3.0.2
Version 1.6.8
Release Date: 18th June 2016
- Added Minimum File Size.
- Support for latest OpenCart v2.2.0.0
Version 1.6.7
Release Date: 8th February 2016
- Fixed SSL file delete link bug
Version 1.6.5
Release Date: 8th November 2015
- Support for latest OpenCart v2.1.0.1
Version 1.6.4
Release Date: 29th June 2015
- Fixed image replace error.
Version 1.6.3
Release Date: 9th June 2015
- Fixed customer account upload error
- Fixed large image file upload preview
Version 1.6.2
Release Date: 26th April 2015
- Fixed same filename issue in image cache
- Fixed custom template not found issue
- Fixed image preview crop off issue
- Fixed image replace issue
- Improved failed file deletion alert message
Version 1.6.1
Release Date: 8th January 2015
- Fixed Upload button not responding in Firefox, IE
- Fixed database installation(update) error
- Fixed unicode filename encoding in IE
Version 1.6
Release Date: 4th January 2015
- File uploads in existing order can be edited from admin order edit.
Version 1.6-beta
Release Date: 2nd January 2015
- Added support for latest OpenCart v2.0.x.
- Filenames now support Unicode(UTF-8).
Version 1.5.8
Release Date: 23rd April 2014
- Fixed ambiguity in table name.
Version 1.5.7
Release Date: 18th January 2014
- Added Email Alert for customer order history and account upload.
- Added Send Files as Email Attachments feature.
Version 1.5.6
Release Date: 28th October 2013
- Fixed force quantity error.
- Fixed admin template to allow strings with single quote character.
Version 1.5.5
Release Date: 28th September 2013
- Fixed empty filetype_ids error
- Fixed missing upload description in customer order history upload
- Fixed new file type entry not saved for Customer & Order upload when being added dynamically
- Fixed customer upload path duplicate when no %customer_id% is used
- Added image dimension limit
- Added image color channel validation check
- Added order status change when customer modify order upload
Version 1.5.4
Release Date: 14th July 2013
- Fix mime validation error.
Version 1.5.3
Release Date: 13th July 2013
- Fix missing order upload in order notification emails.
Version 1.5.2
Release Date: 10th July 2013
- Fix missing javascripts in admin customer upload.
- Fix duplicate admin order edit order upload.
Version 1.5.1
Release Date: 7th July 2013
- Fix missing Order Upload.
Version 1.5.0
Release Date: 1st July 2013
- Upload Progress Bar
- Multi files/batch upload
- Drag & Drop support
- Custom folder
- Custom image preview thumbnail dimension
- Individual product option upload settings
Version 1.4.2
Release Date: 13th February 2013
- Fixed error message variable 'error_minimum' to 'error_upload_minimum' to avoid conflict.
Version 1.4.1
Release Date: 27th January 2013
- Support for latest OpenCart v1.5.5.1
Version 1.4
Release Date: 17th November 2012
- Customer Group restriction
- Store restriction
- Full HTML rich text editor for upload description text
- Force product quantity to match with number of files uploaded
- Product file upload are now associated with current 'file' type options
- Product file upload can be sorted among other product options
Version 1.3
Release Date: 21st March 2012
- Fix order upload minimum when 0 error.
- Fix approve new customer causes empty upload.
- Fix duplicate language 'text_empty'.
- Fix admin delete customer upload not complete.
- Added display uploaded image in shopping cart if 'Replace product image' is set to Yes under product upload.
Version 1.2.1
Release Date: 3rd January 2012
- Fix several missing variables error.
- Fix file type delete validation - file type in use cannot be deleted.
- Fix upload not being deleted when a customer or an order is removed.
- Fix empty file type and extension error.
- Fix MIME check - just leave blank on MIME field to disable MIME checking.
Version 1.2
Release Date: 17th December 2011
- Added support for OpenCart 1.5.0.x - 1.5.1.3
- Added file types management to allow adding own custom file types.
- All features from previous versions are implemented.
Version 1.1
Release Date: 25th May 2011
- Image preview now available upon file upload, limited to image file type (jpeg, png, gif) only.
- Product image can be replaced with uploaded image file.
- Enable custom text message above upload box, useful when you want to give a short instruction or info to your customer.
Version 1.02
Release Date: 13th May 2011
- Fixed guest checkout missing upload.
- Fixed order upload list appear in admin orders even when upload order is disabled.
- Fixed truncated filename and missing file type when downloading files that contains spaces in filename in Firefox.
- Added new popular file extension support: .psd (photoshop).
- Added 2 extra file size limits.
Version 1.01
Release Date: 1st May 2011
- Fixed new registration missing file size bug.
- Added two new popular file extension support: .ai, .eps
Version 1.0
Release Date: 29th April 2011
- Customer Order Product Upload released.
Support
Questions
If you have any questions regarding this extension, please email to [email protected]
Professional Service
We provide a variety of professional services for your OpenCart store.
- Extension Customization
- Extension Integration
- Custom Template Integration
Please email your request to [email protected] and see how we can help you.
Comments and Feedbacks
You can always post your comments, feedback, or suggestion on the extension page here: www.opencart.com/index.php?route=extension/extension/info&extension_id=1887